


| Author: | mloolm |
|---|---|
| Views Total: | 10 views |
| Official Page: | Go to website |
| Last Update: | April 16, 2025 |
| License: | MIT |
Preview:

Description:
GlitchEffect is a lightweight JavaScript library for adding glitch-style visual effects to images without requiring external dependencies, Canvas, or WebGL.
Its main function is to create RGB channel shifts and optional visual noise on a target image container. This makes your image appear as if it is temporarily distorted or glitched.
Use Cases:
- Portfolio Websites – Add a modern, edgy feel to creative portfolios by applying the effect to featured project images that activate on hover or scroll.
- Gaming Websites – Create cyberpunk or retro-digital aesthetics for game landing pages, character profiles, or promotional materials where the glitched visuals enhance the theme.
- Interactive Storytelling – Use the effect during key moments in interactive narratives to represent digital distortion, memory corruption, or technological interference.
- Error Pages – Design more engaging 404 or error pages where the glitch effect adds visual interest while communicating the concept of something being broken.
See It In Action:
How To Use GlitchEffect:
1. Install and import the GlitchEffect via NPM.
# NPM
$ npm install glitch-effect
import GlitchEffect from './glitch-effect.js';
2. If you’re not using a build process or npm, you can include the glitch-effect.js file directly using a script tag with type="module":
<script type="module">
  import GlitchEffect from './glitch-effect.js';
</script>
3. Create a container element for the glitch effect. Give it an ID or class you can select, and importantly, define its dimensions (width and height). The library uses these dimensions for the effect.
<div id="example" style="width: 600px; height: 450px;"></div>
4. Initialize the GlitchEffect with your container and image path:
const container = document.getElementById('my-container');
const glitch = new GlitchEffect(container, '1.jpg');
5. You can customize the glitch effect by passing an options object as the third argument:
const container = document.getElementById('my-container');
const glitch = new GlitchEffect(container, '1.jpg',{
  // Default: 1. Higher number means stronger shift.
  ntensity: 1.5,
  // Default: true. Set to false to disable the noise overlay.
  noise: false
});
How It Works:
When you initialize the library, it first injects necessary CSS styles into the document head. These styles define the container positioning, overlay blend modes, and the noise pattern. The library is careful to namespace all its styles with the ‘ge-‘ prefix to avoid conflicts with existing page styles.
The core of the effect comes from the createStructure() method, which generates four copies of the original image. The base image serves as the foundation, while three additional copies (red, green, and blue channels) are positioned with the same dimensions but given a special blend mode. During the animation cycle, these RGB layers are randomly offset from each other, creating that characteristic color-splitting effect we associate with digital glitches.
The glitch effect doesn’t run continuously but instead fires at random intervals with varying durations. This creates a much more authentic glitched appearance than a constant animation would. The noise overlay also operates on its own independent cycle, fading in and out to create visual texture without becoming overwhelming.
The randomization of both the timing and the transformation values ensures that the effect never feels repetitive or predictable. It’s a clever use of simple DOM manipulation and CSS transforms to achieve an effect that would typically require more complex rendering techniques.
FAQs
Here are some questions that might come up:
Q: How does it perform with many instances on one page?
A: Each instance adds 4-5 DOM elements. Performance is generally good for a moderate number (say, up to 10-20), but monitor DOM size and paint times if you plan to use hundreds. The setTimeout loops are staggered randomly, which helps avoid synchronized performance hits. I’d recommend testing on your specific target devices/browsers if pushing the limits.
Q: Can I customize the animation timing or easing?
A: Not directly via options in the current version. The timing (duration, loop intervals) is randomized within hardcoded ranges in initEffects. You’d need to fork the library or modify the glitchLoop and noiseLoop functions in glitch-effect.js to change these ranges or implement different easing.
Q: Can this be used on background images?
A: Not directly on CSS background-image. It’s designed to work with an <img> element placed inside a container div. You’d need to structure your HTML to use an <img> tag for the visual element you want to glitch, potentially positioning it behind other content using CSS if needed.
Q: Is it responsive?
A: Yes, mostly. It uses width: 100%; height: 100% and object-fit: cover on the internal images, so they adapt to the container size. Ensure your container element (#my-container in the example) is responsive using CSS. The glitch intensity (pixel offset) is absolute, so a very strong glitch on a small container might look different than on a large one – adjust intensity accordingly.
See Also:
 Glitch Images Using CSS Animations – PowerGlitch
 Text Glitch & Skew Effects In CSS
 Text Glitch Effect Using Only CSS
 Cyberpunk 2077 Style Glitch Button In Pure CSS
 Text Glitch (Distortion) Animation On Hover – Glitch.css
 Liquid & Glitch Effects For Images – LiquidEffect.js
 Animated Text Glitch Effect In Pure CSS
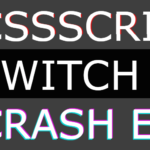 Interactive Glitch/Noise Effects – glitch.js